✨ Elevate Your Space with Style! ✨
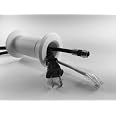
The 1.20" ID Cable Pass Through Wall Port is a stylish solution for running cables through walls, featuring a self-adhesive installation and modern design. Measuring 5.24" x 2.5", this durable wall port is made from high-quality plastic and rubber, ensuring a seamless and organized look for your home or office. Proudly manufactured in the USA, it’s the perfect blend of functionality and aesthetics.
| Installation Type | Self-Adhesive |
| Item Dimensions L x W | 5.24"L x 2.5"W |
| Material Type | Plastic, Rubber |
| Style | Modern |
| Color | White |
J**N
Does exactly what I needed
Installation is just a hair tricky, since you need to find a spot free from studs, wires, or other obstructions.My approach was to first use a thin drill bit to exactly find the edge of the stud -- if I was still getting resistance an inch in, I needed to move over and try again. Then I moved about an inch further, switched to a long (but still thin) bit and bored straight through and out the other side of the wall, taking care to keep this as straight and level as I could; that gave me a mark to center when drilling the far side.I then switched to a hole-saw bit just large enough for the tube to go through, drilled from one side, and sighted/felt to make sure there wasn't a wire going through this area. I didn't expect one, but it's always possible; if you do find one, you may be able to gently push it to the side.After confirming that the path was clear, I drilled from the other side. I then inserted the outer tube, used painter's tape to anchor it in place, went around and screwed the inner tube into it. With the tape holding it I was able to apply a fair amount of force and get the bezels nicely flat to the surface.Then remove the tape, clean up, and I had the cable pass-through my home-entertainment setup needed.Note that the maker offers several sizes; check the biggest plug you'll be passing through to make sure it will go through alongside any other wires you're using, and upsize or downsize appropriately. Personally, I'd lean large so you have space for afterthoughts.I'm going to try painting it to better match the wall color; I've done that with inspection plates and the like and it does help make the widget less noticeable. Still need to figure out how I'm going to hide the wires, but that's a different problem.Maker has been responsive to questions/comments too. I get the impression that this is a startup, which I'd rather support than a bigger company as long as they deliver good value.And this is good value. Not complicated, not "polished" but a well designed, well-executed engineering solution. I don't often give five stars, but I think this is worth actively recommending.
S**Y
Works great, but drill your pilot hole(s) accurately!
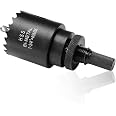
This is a great item for passing wiring through office walls. It's machine printed, looks line, arrived quickly--all good. Now comes MY BLUNDER--don't you make it. I found an area in the wall where there were no studs, and used my 8" drill (1/4" dia) to drill through one wall, then pushed through the insulation to the other drywall, and finished the pilot holes. I then drilled 1-5/8" holes for the passthrough.WHAT I DID WRONG: I was NOT super careful to make sure that my pilot drill was perpendicular to the drywall. As a result, my pilot holes slanted down about 10 degrees. This was enough so that the front and back of the passthrough did not meet up in the middle. Yikes! I had to shave my 1 5/8" holes to get enough wiggle room so that they met up and could easily be screwed together.To be clear, this is a great product; the fault was entirely mine; and it still looks and works fine, but I am still kicking myself for my carelessness.
T**6
You'll need a hole saw but this is a life saver
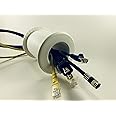
I bought this to run some BNC wires through a wall for a CCTV system. It's sturdy and was very easy to put in, even doing this without an assistant. I do recommend using an extra-long drill bit to guide the hole for drilling, such as these: https://www.amazon.com/dp/B095L1LZ1Z?psc=1&ref=ppx_yo2ov_dt_b_product_detailsYou'll also need a hole saw. This worked perfectly for me: https://www.amazon.com/dp/B089SK8MGW?psc=1&ref=ppx_yo2ov_dt_b_product_detailsBe aware of any studs, wiring, or pipes in the wall before you start. Once you know your location is good, drill your pilot with the appropriate long bit, then hit the wall from both sides with the hole saw. If you have a drill jig I recommend using it to keep the drill square with the wall, otherwise you can use a small square to align the bit prior to drilling and just eyeball it. If there's insulation just pull a hole in it and run your tube through. If you have a second person handy have them hold one end of the tube while you screw the other end down. If you're doing this alone, push the first side of the tube through the hole, then lean something heavy against it. Go to the other side and start threading the tube. Once it's bitten enough, take a plunger (wooden handle, the big plastic handle ones won't work) and push the handle through the hole. Go to the other side, pull on the plunger handle so it pulls the collar toward you, then use your free hand to screw the collar together. The pressure from the rubber on the plunger will hold the opposite side of the collar against the wall. Once you're finished use some paintable caulking or wall filler around the edge for a nice finish.If you have a lot of leftover space I recommend using the wall caps: https://www.amazon.com/dp/B07ZYKHQVJ?psc=1&ref=ppx_yo2ov_dt_b_product_detailsThese help close off the cable run. A little caulk will hold them in place and you can seal up the hole very nicely.Overall this is a very nice and inexpensive method of running cables through-wall from one room to another, or from exterior to interior if you don't want to deal with the hassle and expense of creating junction boxes and cutting, terminating, and crimping cables and doing an attic run isn't practical or possible.
O**D
Simple, strong, does what it should
I just wanted to get an ethernet cable to the other side of an interior wall and have it look halfway nice. Bingo!I drilled all the way through the wall with a long, narrow drill bit. Then I used a hole saw on each side of the wall to make the large hole for this tube. Slid 1/2 of the tube through and had hte wife hold it while I threaded the other half into it from the other side of the wall.EASY!Ended up with a strong, finished pass-through that can easily accomodate several cables.Why only 4-starts instead of 5? I rarely give starts unless the item does something extra. This item does just what it should, and does it well.Might be nice if it was available in a couple different colors (tan, black, brown)
Trustpilot
4 days ago
2 months ago